31 Ekim 2013 Perşembe

Sorting Arrays [C#]

Sorting Arrays [C#]

This example shows how to sort arrays in C#. Array can be sorted using static methodArray.Sort which internally use Quicksort algorithm.

Sorting array of primitive types

To sort array of primitive types such as intdouble or string use method Array.Sort(Array) with the array as a paramater. The primitive types implements interface IComparable, which is internally used by the Sort method (it calls IComparable.Com­pareTo method). See example how to sort int array:
[C#]
// sort int array
int[] intArray = new int[5] { 8, 10, 2, 6, 3 };
Array.Sort(intArray);
// write array
foreach (int i in intArray) Console.Write(i + " ");  // output: 2 3 6 8 10

or how to sort string array:
[C#]
// sort string array
string[] stringArray = new string[5] { "X", "B", "Z", "Y", "A" };
Array.Sort(stringArray);
// write array
foreach (string str in stringArray) Console.Write(str + " "); // output: A B X Y Z

Sorting array of custom type using delegate

To sort your own types or to sort by more sophisticated rules, you can use delegate to anonymous method. The generic delegate Comparison<T> is declared as public delegate int Comparison<T> (T x, T y). It points to a method that compares two objects of the same type. It should return less then 0 when X < Y, zero when X = Y and greater then 0 when X > Y. The method (to which the delegate points) can be also an anonymous method (written inline).
Following example demonstrates how to sort an array of custom type using the delegate to anonynous comparison method. The custom type in this case is a class User with properties Name and Age.
[C#]
// array of custom type
User[] users = new User[3] { new User("Betty", 23),  // name, age
                             new User("Susan", 20),
                             new User("Lisa", 25) };

[C#]
// sort array by name
Array.Sort(users, delegate(User user1, User user2) {
                    return user1.Name.CompareTo(user2.Name);
                  });
// write array (output: Betty23 Lisa25 Susan20)
foreach (User user in users) Console.Write(user.Name + user.Age + " ");

[C#]
// sort array by age
Array.Sort(users, delegate(User user1, User user2) {
                    return user1.Age.CompareTo(user2.Age); // (user1.Age - user2.Age)
                  });
// write array (output: Susan20 Betty23 Lisa25)
foreach (User user in users) Console.Write(user.Name + user.Age + " ");

Sorting array using IComparable

If you implement IComparable interface in your custom type, you can sort array easily like in the case of primitive types. The Sort method calls internally IComparable.Com­pareTo method.
[C#]
// custom type
public class User : IComparable
{
  // ...

  // implement IComparable interface
  public int CompareTo(object obj)
  {
    if (obj is User) {
      return this.Name.CompareTo((obj as User).Name);  // compare user names
    }
    throw new ArgumentException("Object is not a User");
  }
}

Use it as you sorted the primitive types in the previous examples.
[C#]
// sort using IComparable implemented by User class
Array.Sort(users);  // sort array of User objects

Combine Multiple PrintDocuments [C#]

This example shows how to combine two or more PrintDocuments in­to a single PrintDocument. I created a class MultiPrintDocu­ment derived from PrintDocument. Its constructor takes an array of PrintDocument instances as a parameter.
The usage of the MultiPrintDocument class could be like this.
[C#]
// suppose we need to join 3 PrintDocument instances doc1, doc2 and doc3
MultiPrintDocument multiDoc;
multiDoc = new MultiPrintDocument(new PrintDocument[] { doc1, doc2, doc3 });

MultiPrintDocument overrides protected methods OnBeginPrintOnQueryPageSet­tings andOnPrintPage. The overridden methods call the corresponding methods of the child documents. Note that reflection must be used to call the protected methods of child documents.
OnBeginPrint method is called before the first page of the document is printed. The overridden OnBeginPrint method resets the current document index.
OnQueryPageSet­tings method is called immediately before printing each page and is used for getting the PageSettings of the printed page (e.g. to check whether the page orientation is landscape or portrait). The overridden method calls OnQueryPageSettings of the current child document.
OnPrintPage is called to print a page. The overridden method calls OnPrintPage of the current child document. If it is the last page of the document, it increments the current document index and returns a value indicating that there are still other pages to print.
This is the code of the MultiPrintDocument class.
[C#]
using System.Drawing.Printing;
using System.Reflection;

public class MultiPrintDocument : PrintDocument
{
  private PrintDocument[] _documents;
  private int _docIndex;
  private PrintEventArgs _args;

  // constructors
  public MultiPrintDocument(PrintDocument document1, PrintDocument document2)
  {
    _documents = new PrintDocument[] { document1, document2 };
  }

  public MultiPrintDocument(PrintDocument[] documents)
  {
    _documents = documents;
  }

  // overidden methods
  protected override void OnBeginPrint(PrintEventArgs e)
  {
    base.OnBeginPrint(e);
    if (_documents.Length == 0)
      e.Cancel = true;

    if (e.Cancel) return;

    _args = e;
    _docIndex = 0;  // reset current document index
    CallMethod(_documents[_docIndex], "OnBeginPrint", e);
  }

  protected override void OnQueryPageSettings(QueryPageSettingsEventArgs e)
  {
    e.PageSettings = _documents[_docIndex].DefaultPageSettings;
    CallMethod(_documents[_docIndex], "OnQueryPageSettings", e);
    base.OnQueryPageSettings(e);
  }

  protected override void OnPrintPage(PrintPageEventArgs e)
  {
    CallMethod(_documents[_docIndex], "OnPrintPage", e);
    base.OnPrintPage(e);
    if (e.Cancel) return;
    if (!e.HasMorePages)
    {
      CallMethod(_documents[_docIndex], "OnEndPrint", _args);
      if (_args.Cancel) return;
      _docIndex++;  // increments the current document index

      if (_docIndex < _documents.Length)
      {
        // says that it has more pages (in others documents)
        e.HasMorePages = true;
        CallMethod(_documents[_docIndex], "OnBeginPrint", _args);
      }
    }
  }

  // use reflection to call protected methods of child documents
  private void CallMethod(PrintDocument document, string methodName, object args)
  {
    typeof(PrintDocument).InvokeMember(methodName,
      BindingFlags.InvokeMethod | BindingFlags.Instance | BindingFlags.NonPublic,
      null, document, new object[] { args });
  }
}


30 Ekim 2013 Çarşamba

Get List of Windows Services [C#]

This example shows how to get list of windows services installed on local computer.

Get list of installed windows services

To get list of all services (which are not device drivers) use static method ServiceContro­ller.GetServi­ces (to get list of driver services use method ServiceContro­ller.GetDevices).
[C#]
ServiceController[] services = ServiceController.GetServices();

Check whether a service is installed

The following code checks whether a service is installed on local computer. It gets list of windows services and tries to find a service with the specified name.
[C#]
public static bool IsServiceInstalled(string serviceName)
{
  // get list of Windows services
  ServiceController[] services = ServiceController.GetServices();

  // try to find service name
  foreach (ServiceController service in services)
  {
    if (service.ServiceName == serviceName)
      return true;
  }
  return false;
}


Start, Stop and Restart Windows Service [C#]

This example shows how to start, stop and restart a windows service programmatically in C#.

Start service

The following method tries to start a service specified by a service name. Then it waits until the service is running or a timeout occurs.
[C#]
public static void StartService(string serviceName, int timeoutMilliseconds)
{
  ServiceController service = new ServiceController(serviceName);
  try
  {
    TimeSpan timeout = TimeSpan.FromMilliseconds(timeoutMilliseconds);

    service.Start();
    service.WaitForStatus(ServiceControllerStatus.Running, timeout);
  }
  catch
  {
    // ...
  }
}

Stop service

The following method tries to stop the specified service and it waits until the service is stopped or a timeout occurs.
[C#]
public static void StopService(string serviceName, int timeoutMilliseconds)
{
  ServiceController service = new ServiceController(serviceName);
  try
  {
    TimeSpan timeout = TimeSpan.FromMilliseconds(timeoutMilliseconds);

    service.Stop();
    service.WaitForStatus(ServiceControllerStatus.Stopped, timeout);
  }
  catch
  {
    // ...
  }
}

Restart service

This method combinates both previous methods. It tries to stop the service (and waits until it's stopped) then it begins to start the service (and waits until the service is running). The specified timeout is used for both operations together.
[C#]
public static void RestartService(string serviceName, int timeoutMilliseconds)
{
  ServiceController service = new ServiceController(serviceName);
  try
  {
    int millisec1 = Environment.TickCount;
    TimeSpan timeout = TimeSpan.FromMilliseconds(timeoutMilliseconds);

    service.Stop();
    service.WaitForStatus(ServiceControllerStatus.Stopped, timeout);

    // count the rest of the timeout
    int millisec2 = Environment.TickCount;
    timeout = TimeSpan.FromMilliseconds(timeoutMilliseconds - (millisec2-millisec1));

    service.Start();
    service.WaitForStatus(ServiceControllerStatus.Running, timeout);
  }
  catch
  {
    // ...
  }
}

29 Ekim 2013 Salı

Install / Uninstall .NET Windows Service [C#]

This example shows how to install and uninstall a .NET windows service.

Install service using InstallUtil.exe

To install or uninstall windows service (which was created using .NET Framework) use utilityInstallUtil.exe. This tool can be found in the following path (use appropriate framework version number).
C:\WINDOWS\Microsoft.NET\Framework\v2.0.50727\InstallUtil.exe

To install .NET service run command similar to this (specify full path to your service).
InstallUtil.exe "c:\myservice.exe"

To uninstall .NET service use the same command with parameter /u.
InstallUtil.exe /u "c:\myservice.exe"

Install service programmatically

To install service programmatically using C# see the following class ServiceInstaller in c-sharpcorner.com article.

Create Windows Service in Visual Studio [C#]

This example shows step-by-step how to create a windows service in Visual Studio 2005.
Create new project and select windows service (Visual C# / Windows / Windows Service). Enter the project name, e.g. „MyService“.
New Project – Windows Service
View designer of the Service1.cs and click to Add Installer in the Properties window.
Windows Service – Add Installer
It adds a ProjectInstaller­.cs file to the project. This file contains two components, a ServiceInsta­ller and a ServiceProces­sInstaller.
Click to serviceInstaller1 and in the Properties window set ServiceName to „MyService“, change DisplayName (shown in Microsoft Management Console) and fill in the Descriptionfield. You can also set StartType to automatic or manual service starting.
Service Installer – Properties
Click to serviceProces­sInstaller1 and change the Account property to a value you need. It's an account under which the system runs the service. Account descriptions can be found inServiceAccount enumeration.
Service Process Installer – Properties
Complete the implementation of OnStart and OnStop methods in the service class.
Service Code

28 Ekim 2013 Pazartesi

Autoscroll (TextBox, ListBox, ListView) [C#]

This example demonstrates how to programatically autoscroll WinForm controls TextBox, ListBox, ListView, TreeView and DataGridView.
Autoscroll to the end of box or view is useful, for example, in situations when you use one of these components as the output log window. Usually you add the items to the box or view and you want to be sure that the last added item is visible without the necessary to do it manually.
Though it's not difficult to solve this problem, .NET doesn't provide any unified way how to do it.

TextBox autoscroll

[C#]
textBox1.SelectionStart = textBox1.Text.Length;
textBox1.ScrollToCaret();

ListBox autoscroll

[C#]
listBox1.SelectedIndex = listBox1.Items.Count - 1;
listBox1.SelectedIndex = -1;

ListView autoscroll

[C#]
listView1.EnsureVisible(listView1.Items.Count - 1);

TreeView autoscroll

[C#]
treeView1.Nodes[treeView1.Nodes.Count - 1].EnsureVisible();

DataGridView autoscroll

[C#]
dataGridView1.FirstDisplayedCell =
  dataGridView1.Rows[dataGridView1.Rows.Count - 1].Cells[0];


Check Scrollbars Visibility [C#]

Some Windows Forms controls provide an AutoScroll property to specify whether to automatically show scrollbars when the control's content overlaps its visible boundaries. This example demonstates how to find out which scrollbars are visible in a particular control.

Determining the scrollbars visibility

The controls with the auto-scroll functionality provide HorizontalScroll and VerticalScrollproperties which enable you to control the automatically shown scrollbars. Use their Visiblemembers to determine whether the scrollbars are visible to the user.
[C#]
ScrollableControl ctl;

ctl.HorizontalScroll.Visible  // the horizontal scrollbar visibility
ctl.VerticalScroll.Visible    // the vertical scrollbar visibility

To demonstrate the properties usage, we will implement a GetVisibleScro­llbars method that returns a ScrollBars value specifying which scrollbars are visible.
[C#]
using System.Windows.Forms;

protected static ScrollBars GetVisibleScrollbars(ScrollableControl ctl)
{
  if (ctl.HorizontalScroll.Visible)
    return ctl.VerticalScroll.Visible ? ScrollBars.Both : ScrollBars.Horizontal;
  else
    return ctl.VerticalScroll.Visible ? ScrollBars.Vertical : ScrollBars.None;
}

An alternative technique

There is an alternative way how to get the scrollbars visibility based on use of theGetWindowLong API function. This technique unlike the foregoing works also on .NET Framework 1.1.
First, create a Win32 class that imports the GetWindowLong function from the user32.dll library and defines some constants.
[C#]
using System.Runtime.InteropServices;

public class Win32
{
  // offset of window style value
  public const int GWL_STYLE = -16;

  // window style constants for scrollbars
  public const int WS_VSCROLL = 0x00200000;
  public const int WS_HSCROLL = 0x00100000;

  [DllImport("user32.dll", SetLastError = true)]
  public static extern int GetWindowLong(IntPtr hWnd, int nIndex);
}

Next, implement the GetVisibleScro­llbars method that calls GetWindowLong to get a control's window style and examines the returned value to get the visible scrollbars. Use the control's Handle property as the first argument of the GetWindowLong method.
[C#]
using System.Windows.Forms;

protected static ScrollBars GetVisibleScrollbars(Control ctl)
{
  int wndStyle = Win32.GetWindowLong(ctl.Handle, Win32.GWL_STYLE);
  bool hsVisible = (wndStyle & Win32.WS_HSCROLL) != 0;
  bool vsVisible = (wndStyle & Win32.WS_VSCROLL) != 0;

  if (hsVisible)
    return vsVisible ? ScrollBars.Both : ScrollBars.Horizontal;
  else
    return vsVisible ? ScrollBars.Vertical : ScrollBars.None;
}

Using the GetVisibleScro­llbars method

You can add a VisibleScrollbars property to your control that indicates which scrollbars are displayed in the control window.
A change of scrollbars visibility causes the cotrol's client size change, and thus, firing theResize event. Handle this event (e.g. by overriding the OnResize method) to detect scrollbars visibility changes.
[C#]
private ScrollBars _visibleScrollbars = ScrollBars.None;
public ScrollBars VisibleScrollbars
{
  get { return _visibleScrollbars; }
  private set
  {
    if (_visibleScrollbars != value)
    {
      _visibleScrollbars = value;
      OnVisibleScrollbarsChanged(EventArgs.Empty);
    }
  }
}

public event EventHandler VisibleScrollbarsChanged;
protected virtual void OnVisibleScrollbarsChanged(EventArgs e)
{
  if (VisibleScrollbarsChanged != null)
    VisibleScrollbarsChanged(this, e);
}

protected override void OnResize(EventArgs e)
{
  base.OnResize(e);
  VisibleScrollbars = GetVisibleScrollbars(this);
}


27 Ekim 2013 Pazar

Topmost Form at Application Level [C#]

This example demonstrates how to show a topmost non-modal form, but only within an application. The form must not overlap forms from other applications.
If you use Form.TopMost property, the form will overlap all other non-topmost forms, but also those from other applications. Instead of this, set the Form.Owner property to the parent form – the one which should be under the form (e.g. the main form).
[C#]
// use Form.Owner instead of Form.TopMost
form1.Owner = mainForm;

Set DoubleBuffered Property [C#]

This example shows how to set protected property Control.Double­Buffered to true. This is useful, if you want to avoid flickering of controls such as ListView (when updating) or Panel (when you draw on it).
All controls have property DoubleBuffered, but this property is protected. Usually you need to create a new class (inherited from the control) and set the protected property. This example shows a little hack. You can use reflection to access non-public methods and properties. See the example.
[C#]
public static void SetDoubleBuffered(Control control)
{
  // set instance non-public property with name "DoubleBuffered" to true
  typeof(Control).InvokeMember("DoubleBuffered",
      BindingFlags.SetProperty | BindingFlags.Instance | BindingFlags.NonPublic,
      null, control, new object[] { true });
}

26 Ekim 2013 Cumartesi

Separator Line on Form [C#]

This example shows how to create a bevel line in Windows Forms. This line can be used as a visual separator of controls on a form.
Bevel line
To simulate the line in Windows Forms use a Label control. Set its Height to 2 pixels and BorderStyle to Fixed3D. Thats all, see the example.
[C#]
// separator bevel line
label1.AutoSize = false;
label1.Height = 2;
label1.BorderStyle = BorderStyle.Fixed3D;

Redraw a Whole Control on Resize [C#]

When custom controls or Windows Forms controls like Panel are resized, only their newly exposed portions are redrawn. However, this behaviour sometimes does not provide the desired results (see fig. 1 below).
This example shows how to ensure redrawing of the whole control after resizing by setting the control's Resi­zeRedraw property.
A control with only peripheral portions redrawn.
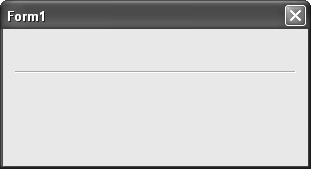
Fig. 1. A partially redrawn control after resizing.

Redrawing the whole control on resize

The ResizeRedraw protected property defined in the Control class indicates, whether the control redraws itself when resized. To ensure redrawing of the whole control on resize set this property to true. This will usually be done in the constructor of a derived class.
[C#]
public MyControl()
{
  InitializeComponent();
  ResizeRedraw = true;
}

Alternatively, if you can not or don't want to create a derived class, set the property using reflection or simply call the Invalidate or Refresh method in the control's Resize event handler.
[C#]
using System.Reflection;

public static void SetResizeRedraw(Control control)
{
  typeof(Control).InvokeMember("ResizeRedraw",
    BindingFlags.SetProperty | BindingFlags.Instance | BindingFlags.NonPublic,
    null, control, new object[] { true });
}

[C#]
myControl.Resize += new EventHandler(myControl_Resize);

private void myControl_Resize(object sender, EventArgs e)
{
  ((Control)sender).Invalidate();
}

A sample control

The following is a code of a user control displaying an ellipse that stretches and shrinks when the control's size changes:
[C#]
public partial class MyControl : UserControl
{
  public MyControl()
  {
    InitializeComponent();
    ResizeRedraw = true;
  }

  protected override void OnPaintBackground(PaintEventArgs e)
  {
    base.OnPaintBackground(e);
    // draw a blue ellipse into the control area
    e.Graphics.FillEllipse(new SolidBrush(Color.Blue), 2, 2,
      ClientRectangle.Width - 4, ClientRectangle.Height - 4);
  }
}

Whithout the ResizeRedraw statement, the control is redrawn only partially and the result looks like in figure 1 above. When the ResizeRedraw = true statement is included, the control is redrawn properly as shown in the following figure 2.
A control with the whole area redrawn.
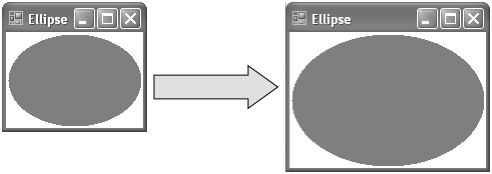
Fig. 2. A properly redrawn control after resizing.

25 Ekim 2013 Cuma

Hourglass Cursor [C#]

This example demonstrates how to show hourglass in C#.
Hourglass cursor
Mouse cursor displayed over any control in windows forms application is determined by Control.Cursor property. If you want to change the mouse cursor at application level use static property Current of Cursor class. To show hourglass cursor assign valueCursors.WaitCur­sor. To return back the default behavior (to display control specific cursor) assign back value Cursors.Default to the Cursor.Current property. See example below.
[C#]
// hourglass cursor
Cursor.Current = Cursors.WaitCursor;
try
{
  Thread.Sleep(5000);  // wait for a while
}
finally
{
  Cursor.Current = Cursors.Default;
}

InputBox With Value Validation [C#]

This example extends previous article how to show an InputBox in C# using simple static method. In this example I use simple class named InputBox with static method Show (to be similar to MessageBox.Show). This implementations brings also value validation.
InputBox with value validation
The following code shows usage of InputBox to get valid email address. It can show two different error messages, one for empty value and another for invalid email address.
[C#]
// InputBox with value validation - first define validation delegate, which
// returns empty string for valid values and error message for invalid values
InputBoxValidation validation = delegate(string val) {
  if (val == "")
    return "Value cannot be empty.";
  if (!(new Regex(@"^[a-zA-Z0-9_\-\.]+@[a-zA-Z0-9_\-\.]+\.[a-zA-Z]{2,}$")).IsMatch(val))
    return "Email address is not valid.";
  return "";
};

string value = "info@example.com";
if (InputBox.Show("Enter your email address", "Email address:", ref value, validation) == DialogResult.OK)
{
  MessageBox.Show(value);
}

This code shows the InputBox class implementation. It has overloaded static method Showwhich takes following paramaters: a dialog title, a prompt text, a default value and optionally a validation delegate. It returns a DialogResult to detect wheather the OK or the Cancel button has been clicked. The value can be obtained from the input/output parameter value.
[C#]
using System;
using System.Drawing;
using System.Windows.Forms;

public class InputBox
{
  public static DialogResult Show(string title, string promptText, ref string value)
  {
    return Show(title, promptText, ref value, null);
  }

  public static DialogResult Show(string title, string promptText, ref string value,
                                  InputBoxValidation validation)
  {
    Form form = new Form();
    Label label = new Label();
    TextBox textBox = new TextBox();
    Button buttonOk = new Button();
    Button buttonCancel = new Button();

    form.Text = title;
    label.Text = promptText;
    textBox.Text = value;

    buttonOk.Text = "OK";
    buttonCancel.Text = "Cancel";
    buttonOk.DialogResult = DialogResult.OK;
    buttonCancel.DialogResult = DialogResult.Cancel;

    label.SetBounds(9, 20, 372, 13);
    textBox.SetBounds(12, 36, 372, 20);
    buttonOk.SetBounds(228, 72, 75, 23);
    buttonCancel.SetBounds(309, 72, 75, 23);

    label.AutoSize = true;
    textBox.Anchor = textBox.Anchor | AnchorStyles.Right;
    buttonOk.Anchor = AnchorStyles.Bottom | AnchorStyles.Right;
    buttonCancel.Anchor = AnchorStyles.Bottom | AnchorStyles.Right;

    form.ClientSize = new Size(396, 107);
    form.Controls.AddRange(new Control[] { label, textBox, buttonOk, buttonCancel });
    form.ClientSize = new Size(Math.Max(300,label.Right+10), form.ClientSize.Height);
    form.FormBorderStyle = FormBorderStyle.FixedDialog;
    form.StartPosition = FormStartPosition.CenterScreen;
    form.MinimizeBox = false;
    form.MaximizeBox = false;
    form.AcceptButton = buttonOk;
    form.CancelButton = buttonCancel;
    if (validation != null) {
      form.FormClosing += delegate(object sender, FormClosingEventArgs e) {
        if (form.DialogResult == DialogResult.OK) {
          string errorText = validation(textBox.Text);
          if (e.Cancel = (errorText != "")) {
            MessageBox.Show(form, errorText, "Validation Error",
                            MessageBoxButtons.OK, MessageBoxIcon.Error);
            textBox.Focus();
          }
        }
      };
    }
    DialogResult dialogResult = form.ShowDialog();
    value = textBox.Text;
    return dialogResult;
  }
}
public delegate string InputBoxValidation(string errorMessage);


24 Ekim 2013 Perşembe

InputBox [C#]

This example demonstrates how to show an InputBox in C# using simple static method.
You can see also new article: InputBox With Value Validation
InputBox
The following code shows the usage of an InputBox static method that simulates InputBox method known from VB and VB.NET. Our InputBox method is defined in a custom class Tmp.
[C#]
string value = "Document 1";
if (Tmp.InputBox("New document", "New document name:", ref value) == DialogResult.OK)
{
  myDocument.Name = value;
}

The method's imple­mentation is in the following code. The method takes three paramaters: a dialog title, a prompt text and the default textbox value. It returns a DialogResult to detect wheather the OK or the Cancel button has been clicked. The input value can be obtained from the input/output parameter value.
[C#]
using System.Windows.Forms;
using System.Drawing;

public static DialogResult InputBox(string title, string promptText, ref string value)
{
  Form form = new Form();
  Label label = new Label();
  TextBox textBox = new TextBox();
  Button buttonOk = new Button();
  Button buttonCancel = new Button();

  form.Text = title;
  label.Text = promptText;
  textBox.Text = value;

  buttonOk.Text = "OK";
  buttonCancel.Text = "Cancel";
  buttonOk.DialogResult = DialogResult.OK;
  buttonCancel.DialogResult = DialogResult.Cancel;

  label.SetBounds(9, 20, 372, 13);
  textBox.SetBounds(12, 36, 372, 20);
  buttonOk.SetBounds(228, 72, 75, 23);
  buttonCancel.SetBounds(309, 72, 75, 23);

  label.AutoSize = true;
  textBox.Anchor = textBox.Anchor | AnchorStyles.Right;
  buttonOk.Anchor = AnchorStyles.Bottom | AnchorStyles.Right;
  buttonCancel.Anchor = AnchorStyles.Bottom | AnchorStyles.Right;

  form.ClientSize = new Size(396, 107);
  form.Controls.AddRange(new Control[] { label, textBox, buttonOk, buttonCancel });
  form.ClientSize = new Size(Math.Max(300, label.Right + 10), form.ClientSize.Height);
  form.FormBorderStyle = FormBorderStyle.FixedDialog;
  form.StartPosition = FormStartPosition.CenterScreen;
  form.MinimizeBox = false;
  form.MaximizeBox = false;
  form.AcceptButton = buttonOk;
  form.CancelButton = buttonCancel;

  DialogResult dialogResult = form.ShowDialog();
  value = textBox.Text;
  return dialogResult;
}


Catching Unhandled Exceptions [C#]

This example shows how to manage all exceptions that haven't been caught in the try-catch sections (in Windows Forms application).
The UnhandledException event handles uncaught exceptions thrown from the main UI thread. The ThreadException event handles uncaught exceptions thrown from non-UI threads.
[C#]
static void Main()
{
  Application.EnableVisualStyles();
  Application.SetCompatibleTextRenderingDefault(false);

  Application.ThreadException += new ThreadExceptionEventHandler(Application_ThreadException);
  AppDomain.CurrentDomain.UnhandledException += new UnhandledExceptionEventHandler(CurrentDomain_UnhandledException);

  Application.Run(new Form1());
}

static void Application_ThreadException(object sender, ThreadExceptionEventArgs e)
{
  MessageBox.Show(e.Exception.Message, "Unhandled Thread Exception");
  // here you can log the exception ...
}

static void CurrentDomain_UnhandledException(object sender, UnhandledExceptionEventArgs e)
{
  MessageBox.Show((e.ExceptionObject as Exception).Message, "Unhandled UI Exception");
  // here you can log the exception ...
}


23 Ekim 2013 Çarşamba

Create New Thread [C#]

This example shows how to create a new thread in .NET Framework. First, create a newThreadStart delegate. The delegate points to a method that will be executed by the new thread. Pass this delegate as a parameter when creating a new Thread instance. Finally, call the Thread.Start method to run your method (in this case WorkThreadFunction) on background.
[C#]
using System.Threading;

Thread thread = new Thread(new ThreadStart(WorkThreadFunction));
thread.Start();

The WorkThreadFunction could be defined as follows.
[C#]
public void WorkThreadFunction()
{
  try
  {
    // do any background work
  }
  catch (Exception ex)
  {
    // log errors
  }
}

Cancel an Asynchronous Method [C#]

This example shows how to implement support for asynchronous method cancellation in your class. It is based on the Create an Asynchronous Method example.
This example is part of asynchronous method implementation series.
We implement a CancelAsync method that signals the asynchronous worker to cancel the operation. This is done by setting a boolean variable that is periodically checked by the asynchronous worker. When the asynchronous worker receives the cancel signal, it finishes and fires the MyTaskCompleted event with the Cancelled flag set.

MyAsyncContext class

To signal the worker, we need an object with a boolean property. This property will be set by the CancelAsync method and periodically checked by the asynchronous worker.
[C#]
internal class MyAsyncContext
{
  private readonly object _sync = new object();
  private bool _isCancelling = false;

  public bool IsCancelling
  {
    get
    {
      lock (_sync) { return _isCancelling; }
    }
  }

  public void Cancel()
  {
    lock (_sync) { _isCancelling = true; }
  }
}

We add a member of the MyAsyncContext type to our class.
[C#]
private MyAsyncContext _myTaskContext = null;

This member is set in the MyTaskAsync method when the asynchronous operation is invoked. The same MyAsyncContext instance is passed also to the asynchronous worker.
[C#]
public void MyTaskAsync(string[] files)
{
  MyTaskWorkerDelegate worker = new MyTaskWorkerDelegate(MyTaskWorker);
  AsyncCallback completedCallback = new AsyncCallback(MyTaskCompletedCallback);

  lock (_sync)
  {
    if (_myTaskIsRunning)
      throw new InvalidOperationException("The control is currently busy.");

    AsyncOperation async = AsyncOperationManager.CreateOperation(null);
    MyAsyncContext context = new MyAsyncContext();
    bool cancelled;

    worker.BeginInvoke(files, context, out cancelled, completedCallback, async);

    _myTaskIsRunning = true;
    _myTaskContext = context;
  }
}

private readonly object _sync = new object();

Asynchronous code modifications

The asynchronous worker must be modified to support cancellation. As you could notice in MyTaskAsync code, we added one input parameter of type MyAsyncContext and one output boolean parameter. The latter one indicates, whether the operation has been cancelled, when the worker finishes.
[C#]
private void MyTaskWorker(string[] files, MyAsyncContext asyncContext,
  out bool cancelled)
{
  cancelled = false;

  foreach (string file in files)
  {
    // a time consuming operation with a file (compression, encryption etc.)
    Thread.Sleep(1000);

    if (asyncContext.IsCancelling)
    {
      cancelled = true;
      return;
    }
  }
}

private delegate void MyTaskWorkerDelegate(string[] files,
  MyAsyncContext asyncContext, out bool cancelled);

The worker periodically test the asyncContext.Is­Cancelling property. If the property is set to true, the output parameter cancelled is set and the method is finished.
The value of the cancelled parameter is copied to the AsyncComplete­dEventArgs.Can­celledproperty in asynchronous operation completed callback.
[C#]
private void MyTaskCompletedCallback(IAsyncResult ar)
{
  // get the original worker delegate and the AsyncOperation instance
  MyTaskWorkerDelegate worker =
      (MyTaskWorkerDelegate)((AsyncResult)ar).AsyncDelegate;
  AsyncOperation async = (AsyncOperation)ar.AsyncState;
  bool cancelled;

  // finish the asynchronous operation
  worker.EndInvoke(out cancelled, ar);

  // clear the running task flag
  lock (_sync)
  {
    _myTaskIsRunning = false;
    _myTaskContext = null;
  }

  // raise the completed event
  AsyncCompletedEventArgs completedArgs = new AsyncCompletedEventArgs(null,
    cancelled, null);
  async.PostOperationCompleted(
    delegate(object e) { OnMyTaskCompleted((AsyncCompletedEventArgs)e); },
    completedArgs);
}

CancelAsync method

This method signals the asynchronous worker to cancel the operation. It uses the MyAsyncContext instance that was created during asynchronous operation invokation.
[C#]
public void CancelAsync()
{
  lock (_sync)
  {
    if (_myTaskContext != null)
      _myTaskContext.Cancel();
  }
}

Note: If you have only one asynchronous method in your class, consider renaming the CancelAsync method to a name similar to MyTaskAsyncCan­cel. All the asynchronous operation related methods will then be displayed together in Visual Studio.

In this series

  1. [C#] Create an Asynchronous Method – how to create an asynchronous method
  2. [C#] Asynchronous Method Progress Reporting – how to report progress
  3. [C#] Cancel an Asynchronous Method – implement cancellation support